Checklist for Fixing eSIM Call Problems
https://www.zimconnections.com/fixing-esim-call-problems-checklist/
 SHARE
SHARE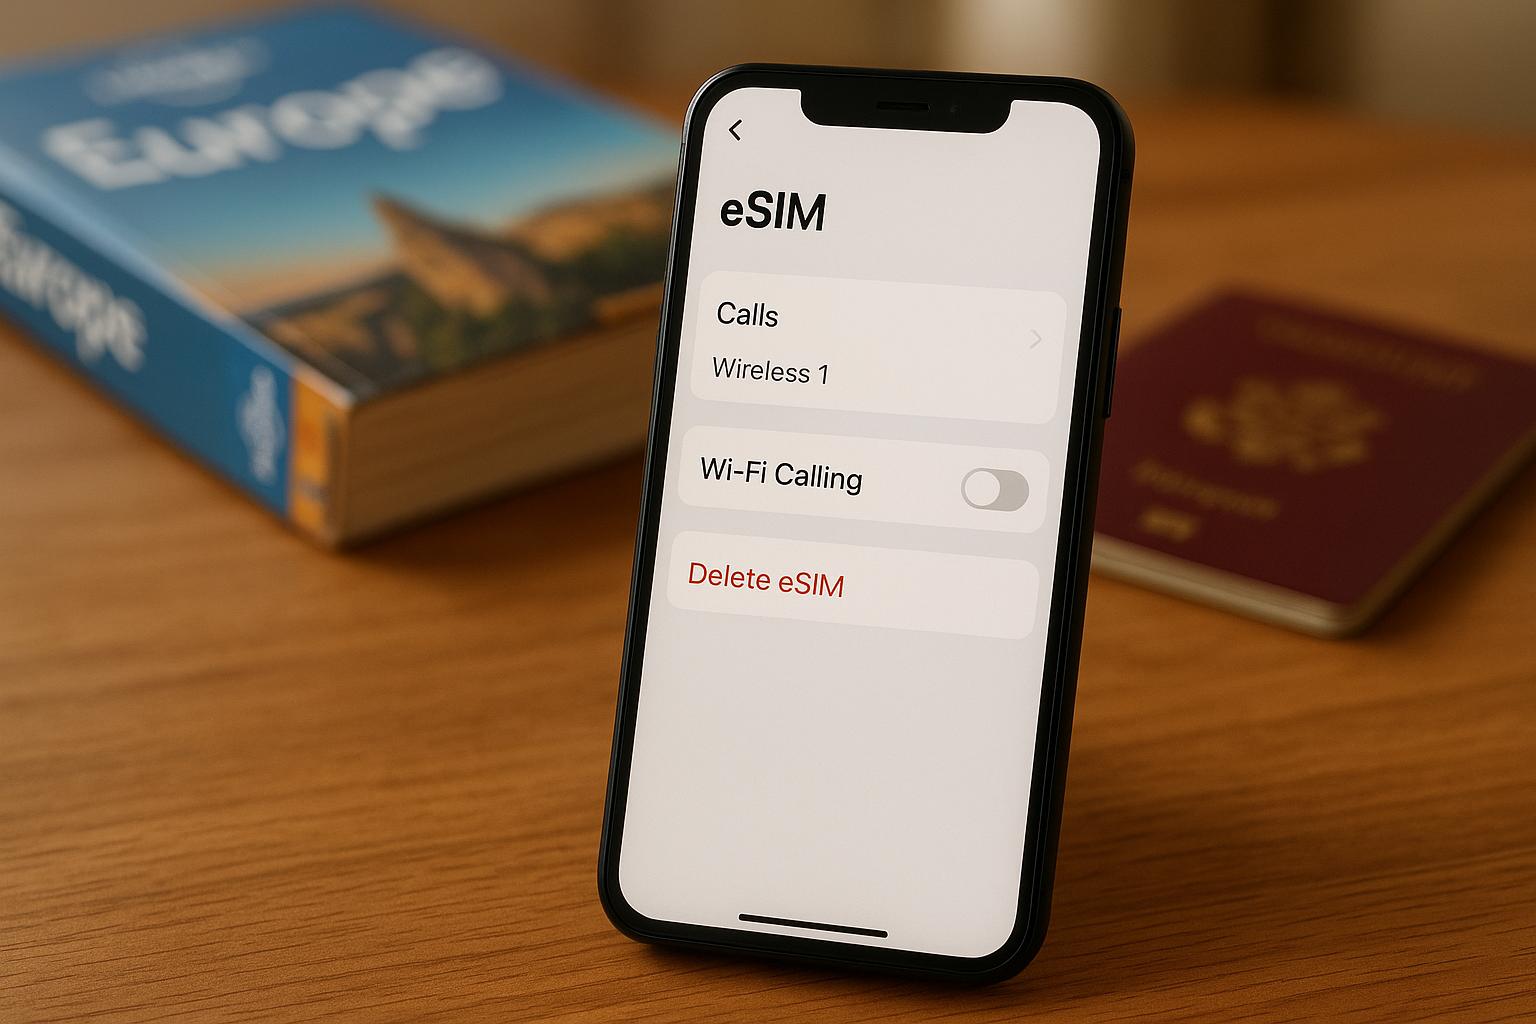
If your eSIM isn’t handling calls as expected, you’re not alone. Many travellers face issues like failed outgoing calls, misconfigured settings, or plans that don’t include voice services. Here’s a quick summary to get you back on track:
- Device Compatibility: Ensure your phone supports eSIM and is unlocked. Check for the 32-digit EID in settings and test with a different carrier’s SIM.
- eSIM Profile Setup: Confirm the eSIM is installed and active. For dual SIM users, set the eSIM as the default for calls.
- Plan Details: Verify your eSIM plan includes voice calling. Many plans are data-only.
- Network Issues: Reset your network connection by toggling Airplane Mode or resetting network settings.
- Software Updates: Install the latest updates for your device to avoid compatibility issues.
- APN Settings: Ensure the correct APN is configured for your eSIM.
- Support: If all else fails, contact your eSIM provider for assistance.
These steps address common problems like misconfigurations, network conflicts, and incomplete setups. Follow them to resolve your eSIM call issues efficiently.
How To Fix eSIM Showing Emergency Calls Only (How To Troubleshoot eSIM Showing Emergency Calls Only)
Step 1: Check Device Compatibility and Unlock Status
Before diving into potential network or configuration issues, make sure your device supports eSIM and isn’t locked to a specific network. Many call-related problems stem from these basic compatibility checks.
How to Verify eSIM Support on Your Device
To confirm eSIM support, look for the 32-digit EID (Embedded Identity Document) in your device settings.
- For iPhones: Navigate to Settings > General > About and locate the EID. If you find a 32-digit EID, your device supports eSIM.
- For Android devices: The EID location depends on the manufacturer. Typically, you’ll find it under Settings > About Phone > Status or Settings > Connections > SIM Card Manager.
If there’s no EID, your device does not support eSIM. Common eSIM-compatible models include the iPhone XS and newer, Google Pixel 3 and later, Samsung Galaxy S20 series and onwards, along with most flagship Android devices from major brands.
Some devices offer dual eSIM support, while others allow one eSIM alongside a physical SIM. This setup can influence how voice services are managed.
How to Check if Your Device is Unlocked
A network-locked device can block international eSIM calls by restricting connectivity to its original network.
The simplest way to check if your device is unlocked is to insert a SIM card from a different carrier. If it connects to the network, your device is unlocked. If you’re focusing on eSIM issues, you can also verify unlock status via your device settings or by contacting your original carrier.
In the UK, unlocking policies vary:
- EE: Devices are automatically unlocked after the contract ends.
- Vodafone: Unlocking may require a formal request.
- Three: Most devices are sold unlocked by default.
If your device is locked, contact your carrier to request an unlock. UK carriers typically unlock devices for free after contract obligations are met, though some may charge a fee for early unlocking. Once approved, the process usually takes 24–48 hours.
Devices purchased directly from manufacturers like Apple or Google are generally sold unlocked. However, those bought through carrier contracts or financing agreements are often locked until certain conditions are fulfilled.
Step 2: Check eSIM Profile and Activation
Once you’ve confirmed your device is compatible with eSIM and unlocked, the next step is to ensure your eSIM profile is properly installed and activated. Many call-related issues stem from incomplete profile setups, so taking a moment to verify this can save you a lot of hassle.
Check eSIM Profile Installation
Before you can make voice calls, your eSIM profile needs to be installed and active. You’ll find it listed in your mobile settings, alongside any physical SIM cards.
For iPhone users, head to Settings > Mobile Data. Here, you should see all available lines, including your ZIM Connections eSIM plan. Check that the status reads "Active".
For Android devices, look under Settings > Connections > SIM Manager or Settings > Network & Internet > Mobile Network. Follow the prompts provided by your device’s manufacturer to check the status of your eSIM and ensure it is active.
If the eSIM profile isn’t visible or is inactive, you may need to reinstall it. Use the original QR code or activation details provided by ZIM Connections. Additionally, confirm that the ICCID in your settings matches the details given during activation.
Set eSIM as Default for Calls
Even with an active eSIM, it won’t automatically become your primary line for calls. If you’re using both an eSIM and a physical SIM, you’ll need to manually set which one handles voice calls.
On iPhones with multiple lines, go to Settings > Mobile Data > Default Voice Line and select your ZIM Connections eSIM. This ensures all outgoing calls default to your eSIM. You can also customise this on a per-contact basis by editing individual contact settings.
For Android devices, the process varies by manufacturer. On Samsung devices, navigate to Settings > Connections > SIM Card Manager, then choose "Preferred SIM card" or "Default SIM for voice calls" and set your eSIM as the default. For Google Pixel users, go to Settings > Network & Internet > SIMs, select your eSIM, enable it, and set it as the default for calls.
If you’re travelling internationally, double-check that the eSIM line is activated and enable Data Roaming if required. Some voice services depend on data connectivity to function properly. These steps will ensure your device is ready for smooth voice call routing as you move on to reviewing your plan details.
Step 3: Check Plan Details and Local Number Setup
Before diving into calls and texts, make sure your eSIM plan includes voice calling. Many plans are designed for data use only, which could catch you off guard if you’re expecting full phone functionality.
Verify Voice Calling in Your Plan
Most eSIM plans are data-only, meaning they provide internet access but don’t come with a traditional phone number for calls or SMS. This is an easy detail to miss, especially if you’re travelling and need a fully functional number.
Take a moment to review your plan details or check your account dashboard. If voice calling is included, it will be clearly stated in the plan description, along with a dedicated phone number. Look out for terms like "voice calls", "call and text services", or "international phone number" in the documentation.
For device-specific settings, head to your phone’s SIM management options to confirm everything is set up correctly. Test outgoing calls to ensure they work, and check that you have enough calling credits. This is particularly important if your plan charges for calls on a pay-per-use basis, as some users have reported issues with insufficient credits.
Once you’ve confirmed voice calling, it’s time to check your local number setup.
Check Local Number Status
If your plan supports voice calling, your local (or international) number should be active and properly set up.
After activation, your assigned number will appear in your device settings. On iPhones, you can find this under Settings > Phone > My Number or in the eSIM details under Settings > Mobile Data. For Android devices, check under Settings > About Phone > Status or within your SIM management settings.
If your number is visible but calls aren’t going through, the issue might be related to network provisioning. This can sometimes happen within the first few hours of activation, as it takes time for your number to register across international networks.
If you’re experiencing problems with a plan that includes call features, reach out to your eSIM provider’s support team for help. For example, ZIM Connections support can check whether your number is fully activated and assist with resolving any network-side provisioning issues.
Step 4: Fix Network and Connection Issues
Sometimes, network hiccups can interfere with eSIM calls, even when your device shows signal bars. A simple refresh of your network connection can often resolve these problems.
Reset Network Connection
One of the quickest ways to address connection issues is by resetting your link to mobile towers. You can do this by enabling Airplane Mode, which temporarily disables your device’s radio connections.
To activate Airplane Mode, head to your device’s control centre or settings menu. Turn it on, wait for about 30 seconds, and then turn it off again. This brief pause allows your device to fully disconnect before searching for available networks to reconnect.
If toggling Airplane Mode doesn’t help, you might need to reset your network settings. On an iPhone, navigate to Settings > General > Transfer or Reset iPhone > Reset > Reset Network Settings. You’ll need to enter your passcode and confirm the reset.
Don’t worry – this action won’t delete your eSIM profile or contacts. However, it will erase saved Wi-Fi passwords, cellular preferences, and VPN configurations. Once the reset is complete, your device will automatically reboot and reconnect to the mobile network with fresh settings.
sbb-itb-273ea09
Step 5: Update Software and Reset Network Settings
If resetting your network connection (Step 4) didn’t solve your call issues, it’s time to update your device’s software and reset network settings. Outdated software can create compatibility problems, making it hard for your eSIM to handle calls properly.
Install Software Updates
Before starting, make sure your device is charged (at least 50%), backed up, and connected to a stable Wi-Fi network.
For iPhone and iPad users, head to the Settings app, tap General, and then choose Software Update to check for available updates. If your device says it’s “up to date” but you suspect otherwise, it could mean your hardware isn’t compatible with the latest iOS versions.
If there’s an update, tap Download and Install and follow the instructions on the screen. To make things easier in the future, you can enable automatic updates by navigating to Settings > General > Software Update > Automatic Updates and turning on both “Download iOS Updates” and “Install iOS Updates.” For quicker security patches, you can also enable “Security Responses & System Files” in the same menu.
For Android users, open the Settings app and look for About phone or About tablet. Tap Android version to check for updates. The exact menu names may vary depending on your device’s manufacturer, but the process is generally similar across most Android devices.
Keeping your software up to date improves security, enhances eSIM performance, and ensures compatibility with the latest network protocols [12]. Many eSIM-related call issues are rooted in outdated software that doesn’t fully support newer technologies.
Reset Network Settings
If updating your software doesn’t fix the problem, the next step is to reset your network settings. This goes beyond the network connection reset from Step 4 and clears all network configurations.
On an iPhone, navigate to Settings > General > Transfer or Reset iPhone > Reset > Reset Network Settings. You’ll need to enter your passcode and confirm the action. Don’t worry – this won’t delete your eSIM profile, contacts, or personal data, but it will erase saved Wi-Fi passwords, mobile network preferences, and VPN configurations.
If the issues persist after the simpler network reset in Step 4, this more thorough reset can clear corrupted settings that might be blocking calls. Your device will restart and rebuild its network preferences from scratch, so you’ll need to reconnect to Wi-Fi networks.
Updating your software ensures your device works with modern network protocols, while resetting network settings clears out any lingering misconfigurations that could be causing problems.
Step 6: Fix Local Number Call Problems
If your eSIM is still unable to make or receive calls after updating the software and resetting network settings, the issue might be linked to your local number configuration. This is often caused by incorrect network settings or interference from other services running on your device.
Check APN Settings
The Access Point Name (APN) settings determine how your device connects to the mobile network for both data and voice services. If these settings are incorrect, calls may not go through, even if your eSIM profile is installed properly.
To check APN settings on an iPhone, follow these steps:
Settings > Mobile Data > Mobile Data Options > Mobile Data Network.
Here, you’ll find fields for APN, Username, and Password. If you’re using ZIM Connections’ eSIM service, these should have been configured automatically during activation.
For Android devices, navigate to:
Settings > Network & Internet > Mobile Network > Advanced > Access Point Names.
Locate the APN linked to your eSIM and tap it to review its details.
If the APN settings are missing or incorrect, contact ZIM Connections support for guidance. Different regions and network operators often require specific APN configurations, and using the wrong ones can block voice calls. Avoid guessing these settings, as incorrect inputs could create further problems.
Some devices automatically switch between APNs when multiple profiles are installed. To ensure proper functionality, confirm that your eSIM’s APN is selected as the active one for both mobile data and voice services.
Additionally, disable any VPNs or enterprise profiles that might interfere with call routing.
Turn Off VPNs and Enterprise Settings
VPNs or managed device profiles can sometimes disrupt call functionality. Temporarily disabling them can help identify the issue.
To disable a VPN on an iPhone:
Settings > General > VPN & Device Management.
On Android devices:
Settings > Network & Internet > VPN.
For enterprise profiles, check:
- iPhone: Settings > General > VPN & Device Management
- Android: Settings > Security > Device Administrators
Corporate profiles may interfere with your personal eSIM’s call functionality. If this is the case, consult your IT department about adjusting these policies, or consider using a separate device for your personal eSIM.
Restart Your Device
Once adjustments are made, restart your device to apply the changes. Restarting can resolve network issues by resetting interfering processes and refreshing your connection to the mobile network.
"First, you can restart the phone. This fixes most network problems on smartphones", explains Andrew H. MLIS, Expert.
For a standard restart, press and hold the power button until the power-off option appears. Select "Power off" or "Restart." Once the device is completely off, wait about 30 seconds before turning it back on.
"The easiest and often the most effective way to resolve a no service or signal issue on an Android device or Samsung phone is to restart it. Doing so will reset any processes that may be interfering with your device’s performance", notes Asurion’s technical team.
If your device becomes unresponsive, perform a forced restart by holding the Power and Volume Down buttons for 10–20 seconds until the logo appears.
After restarting, make a quick test call to confirm that your local number is functioning correctly.
Step 7: Contact ZIM Connections Support
If you’ve tried all the previous troubleshooting steps and the issue persists, it’s time to reach out for expert help. ZIM Connections support is there to tackle more complex problems that might require advanced solutions.
Verify Your Local Number Setup with Support
If your local number still isn’t working after following the earlier steps, contacting ZIM Connections support can help ensure it’s properly set up on their network. They can also check for any issues on their end. Before reaching out, double-check that your eSIM plan is active through your ZIM account.
When contacting support, have these details ready:
- Your smartphone’s brand, model, and operating system (OS).
- A brief summary of when the calling issues first started.
If this step doesn’t fix the problem, you can escalate the matter to live support.
Resolving Advanced Issues with Live Support
For more complicated issues, ZIM Connections offers live support to help you resolve problems like failed calls, even when your connectivity seems fine. Through this service, you can explain your situation in detail and get tailored solutions based on your device, location, and plan settings.
When reaching out, include any error messages you’ve encountered and a summary of the troubleshooting steps you’ve already tried. This will help the support team quickly pinpoint the problem and provide an effective resolution.
Conclusion: Quick Steps to Fix eSIM Call Issues
Resolving eSIM call issues often starts with the basics: check your device’s compatibility, ensure it’s unlocked, and confirm the eSIM is set up correctly. These simple steps typically address most calling problems.
If those checks don’t work, it’s time to look at network-related fixes. A good place to start is resetting your network settings – this often clears up persistent call issues.
Sometimes, what seems like an eSIM problem is actually a hardware issue. To rule this out, test your microphone and speaker by recording a voice memo. If you notice any problems, reinstalling your eSIM profile might help resolve the issue.
Your network provider also plays a key role in ensuring smooth connectivity. For those travelling within the UK or internationally, ZIM Connections offers reliable international eSIM plans that provide voice and data coverage in over 200 destinations. Their straightforward activation process helps avoid many of the common connectivity problems travellers encounter.
If none of these solutions work, reach out to ZIM Connections support. Be sure to include details about your device and the troubleshooting steps you’ve already tried. Their live support team can help you tackle more complex issues and get your eSIM calling up and running without a hitch.
FAQs
Why is my eSIM profile not showing as active on my device?
If your eSIM profile is installed but not appearing as active, a good first step is to restart your device and toggle Airplane Mode on and off. This can help refresh your network connections. After that, check your mobile settings to make sure the eSIM line is enabled and verify with your provider that your eSIM plan is active.
Still having trouble? Try resetting your network settings or removing and reinstalling the eSIM profile. These steps often clear up connectivity issues and get your eSIM working as it should.
How can I check if my eSIM plan supports voice calls and isn’t data-only?
If you want to check whether your eSIM plan includes voice calls, take a close look at the plan details from your service provider. Keep an eye out for terms like voice calling or voice services, as certain plans might only cover data. In such cases, you may need to use separate VoIP apps to make calls. If you’re uncertain, it’s always a good idea to reach out to your provider directly to clarify what the plan offers.
What should I do if resetting my network settings doesn’t fix my eSIM call issues?
If resetting your network settings doesn’t fix the issue, the next step is to ensure your eSIM plan is active and works with your device. Reach out to your carrier to confirm that the eSIM has been properly set up and there aren’t any service interruptions on their end.
It’s also worth checking if your device’s software is up to date. Installing the latest updates can sometimes resolve compatibility or network-related problems. Another quick trick is toggling Airplane Mode on and off, which can refresh your network connections. Don’t forget to verify that your carrier settings are current – these are usually updated automatically, but occasionally, manual intervention might be needed.
If none of this works, it’s a good idea to contact your carrier’s support team. They can double-check your account details and guide you through troubleshooting steps tailored to your specific eSIM plan.